Understanding how records work is vital to placing the needle on the record in the correct place. So, how do you know where the correct place on the record is? Well, don’t worry, I won’t let you scratch up your records by dropping the needle in the wrong spot.
If you are playing a record from the beginning, there is a narrow band around the outside edge of the vinyl record called the lead-in; place the needle here to begin playback. If you look at the record from an angle, you’ll see a slightly darker band.
If you are playing the record from a particular track, you’ll need to use a different method of finding the location, which I’ll detail below. I’ll also explain why the lead-in is essential to use, rather than just dropping the needle into a groove, so stick with me to the end. Let’s get this spinning, shall we?
Where Does The Needle Go On A Record? It Depends Where You Want To Play.

The longest vinyl record in standard production is the twelve-inch 33 ⅓ rpm recording. This size of the record can store about 22 minutes of music per side for a total of about 44 minutes. These records are used for albums and LPs.(source)
The record is divided up by the music recorded on it. Regardless of the music, whether it’s an album of songs or a symphony, there will be a lead-in and lead-out on either end of the recording, on both sides of the record.
Placing the needle in the lead-in zone of the record is ideal when starting from the beginning.
Placing the needle on the lead-in ring segment separating tracks on a vinyl record is possible but not advised for the new turntable apprentice. I’ll get into why in a moment.
Needle Safe Zones
There are three ‘needle safe zones on a vinyl record:
- Lead-In Zone
- Mid Lead-In/Out Zones
- Lead-Out Zone
A quick explanation of each, and we’ll get to why these are fundamentally essential areas to release the needle onto the vinyl.
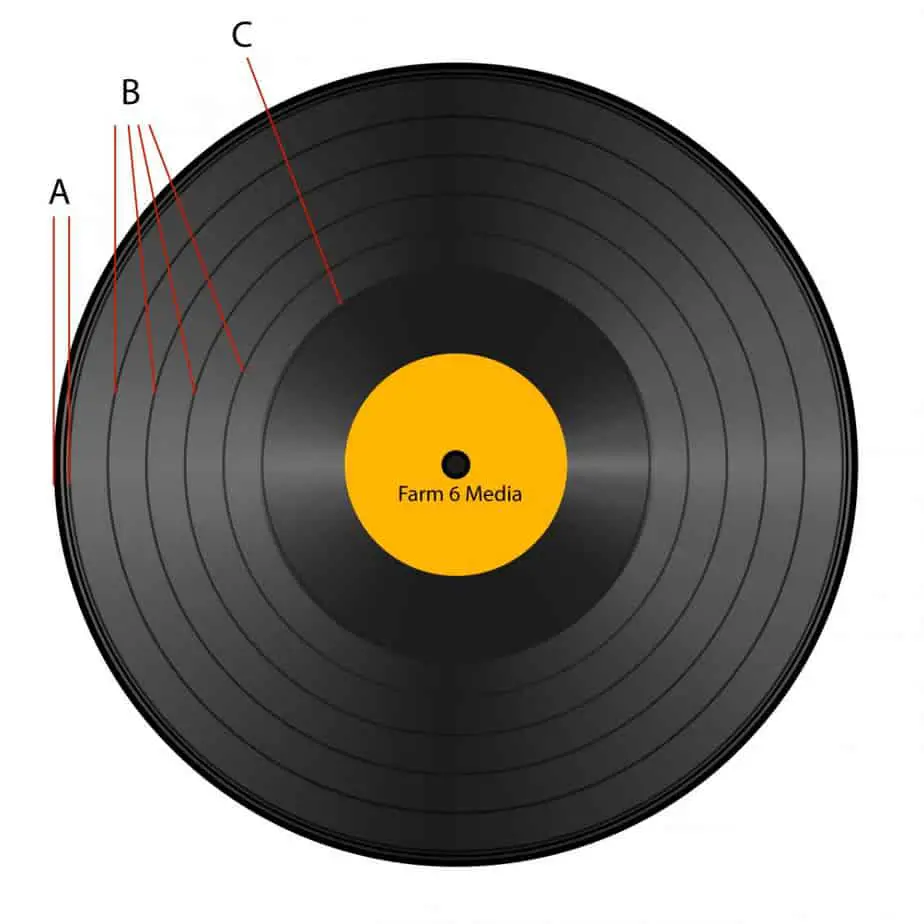
Following, you will find the explanations of each of the needle dropping-safe zones. The image below the three-zone descriptions shows each area on the record for easy reference.
A – Lead-In Zone
The intended area where the needle should meet the vinyl record. Audiophiles will tell you that you should play a record from beginning to end without disturbance. It means starting in the lead-in zone and nowhere else.
The lead-in zone is the wider of the dark circles around the record. The lead-in zone is on the outermost edge of the record. The position of the lead-in zone is dependent upon the fact that the record is designed for play, starting at the outer edge and working inward.
B – Mid-Lead-In/Out Zones
The mid-lead-out or mid-lead-in zones are the darker rings that appear on a record. These zones are in between tracks on the record.
The number of mid-lead-in/out zones depends on the number of tracks on the record. You can count these rings to find the place to drop the needle to start at a particular track on the album rather than the beginning.
How To Find A Track On A Record By Counting Lead-In/Out Zones
- Start at the outer edge of the record. Often the sleeve or label will state a side A or side B and which tracks are on each side. The outer edge of the record has the main lead-in area. This area is off-color compared to the bulk of the record, making it fairly easy to discern. Count this area as one because it leads into track 1 of the record.
- The next small ‘line’ that shows on the record, closer to the center label, is the lead-out zone for track 1 and also the lead-in zone for track 2. Therefore, we can call this area the track 2 lead-in zone.
- Count subsequent ‘lines’ on the record, counting up from the first (1) on the outer edge of the record until you find the ‘line’ or lead-in zone for the appropriate track you are looking for.
- That’s it! Now use extreme caution to set the needle in place. Caution aids in preventing damage to your record, or the needle for that matter.
C – Lead-Out Zone
Although the lead-out zone and final locking grooves are acceptable to drop the needle, I can’t imagine why anyone would bother. There are no tracks after the final lead-out zone near the center of the record. This zone leads to a locking groove that is designed to skip to hold the needle from meandering into the record label section.
Why Not Drop The Needle Anywhere On The Record?
Take a good, long look at your record. The tiny lines are grooves that are cut, near microscopically, into the vinyl record. Can you see the tiny nuances within a cut groove that show the sounds of a track? Not likely!
The grooves on a vinyl record are only about 0.0015 to 0.00314 inches wide; that’s 0.04 to 0.08 mm wide for those of you using metric. The last time I checked, that was very small and near impossible for normal humans to see the detail. (source)
Now, consider the enormous clumsy hands of a human compared to that microscopic-like world where one could see the nuances of the cut groove.
With that in mind, drop the needle on this fine-cut groove, and you’re likely to cause permanent damage. Likewise, if you drop the needle regularly on a place on the record, you will invariably cause damage.
How Tracking Force Is Involved
The downward pressure applied to the stylus, and thus the needle, will invariably play a role in how your needle interacts with your records. And it doesn’t just affect regular play; it affects dropping the needle as well. (source)
The tracking force pushes down on the needle to hold it in place in the record groove. However, some novice DJs tend to set their tracking force high to let them get away with more when it comes to scratching.
A greater tracking force equates to a heavier needle. When dropped on the lead-in zone, the needle can score the record, causing an annoying and possibly loud blip in the silence before or after a track starts.
The Best Way To Drop The Needle
Before playing any records, you should ensure your record player is tuned correctly.
Proper turntable tuning involves balancing the tonearm with the cartridge in place.
Balancing the tonearm is essential for the proper tracking force application to the record. However, as mentioned earlier, one can damage a record if the force is too great.
After balancing the tonearm assembly and placing the record on the platter, start up the spin.
Gently lift the tonearm out of the holding cradle. Most record needle cartridges have a built-in handle for moving the tonearm assembly. I like to use mine by holding a finger under the lever arm, letting the weight of the tonearm hold it in place on my finger while I maneuver it to the lead-in zone.
By lowering the needle by holding your finger under the cartridge handle, you ensure you put zero extra pressure on the record via the needle. You simply lower the needle, and that’s it; no downward force applied.
FAQ
Do records start in the middle or outside?
Records start around the outer edge of the record. As the record plays, the needle and tonearm will gradually wander towards the center of the record.
Does dropping the needle on the record damage it?
If by ‘it’ we are referring to the needle, the answer is that it will not likely damage the needle. However, if we refer to the record made of PVC plastic compared to the rigid diamond needle, then the answer is yes; dropping the needle can damage it (the record).
Can you stop a record with the needle down?
Technically, you can stop a record with the needle down, but it isn’t advised for the sake of the record.
The best practice is to lift the needle off the record gently, but only when the needle has reached a lead-in or lead-out zone. That way, you don’t risk damaging where the audio is recorded on the vinyl record.