Category: Record Player Needles

  • How To Fix A Bent Needle On A Record Player (6 Simple Steps)

    How To Fix A Bent Needle On A Record Player (6 Simple Steps)

    When your record player tonearm comes crashing down for whatever unfortunate reason, it often results in a bent needle. Sometimes you’ll be able to fix the needle; most of the time, you won’t. For those times that you can, I’ve got your instructions. And I’ll help you figure out if it’s feasible or if you’re out of luck.

    Fixing a bent needle for a record player cartridge is a delicate and somewhat challenging procedure. The skills require the hands of a surgeon, the patience of a saint, and a few special tools.

    Most of the time, a damaged needle on a cartridge means either replace or repair professionally. Some adventurous turntable owners choose option C: attempt the repair yourself (like I did). My hat is off to you brave folk, and for that, I bring you my knowledge of how to fix a bent needle on a turntable from my own attempts at repair.

    Understanding The Needle Helps Know How To Fix A Bent Needle On A Record Player

    There are two types of record player cartridges: the moving magnet and the moving coil. Which one you have may determine whether or not you want to attempt to repair yourself.

    Moving Coil Cartridges

    Moving coil cartridges are typically more expensive and preferred by audiophiles. (source)

    The cartridge works by having a coil attached directly to the needle. The coil itself is suspended in a magnetic field, and as it moves, the field changes, causing a charge. It’s how the assembly produces the audio signal. (source)

    The signal is fragile and the unit extremely sensitive. These cartridges are more expensive due to their delicate and tiny construction. When the needle of a moving coil cartridge is bent, it is best left to the professionals to attempt repair. If the coil cartridge is worth anything less than about $150, I would recommend merely replacing it rather than going through the hassle of repair. However, it depends on the repair costs too. Most technicians capable of repairing these types of cartridges charge top dollar for their skills.

    Moving Magnet Cartridges

    A moving magnet cartridge does a similar job to the moving coil but reverses the process in a sense. The needle is attached to a magnet that moves. The coil is built into the cartridge and surrounds the magnet. As the needle moves in the tiny grooves on your records, the magnet wiggles inside the cartridge, causing changes to the magnetic field inside. It is how the cartridge creates the audio signal.

    (source)

    Although not as fine a sound as a moving coil cartridge, as some would say, the moving magnet type is typically considerably cheaper. This cost difference is the reason why most turntables come with a moving magnet type of cartridge.

    Six Steps To Repairing A Bent Needle On A Turntable Cartridge

    When you’re feeling bold, or maybe you’ve got nothing to lose because you intend to buy a replacement anyway, you can attempt to repair your own bent needle on your record player. Here are a few simple steps to follow, which I’ll detail after the steps.

    1. Remove
    2. Clamp
    3. Inspect
    4. Align
    5. Reinstall
    6. Test

    Remove

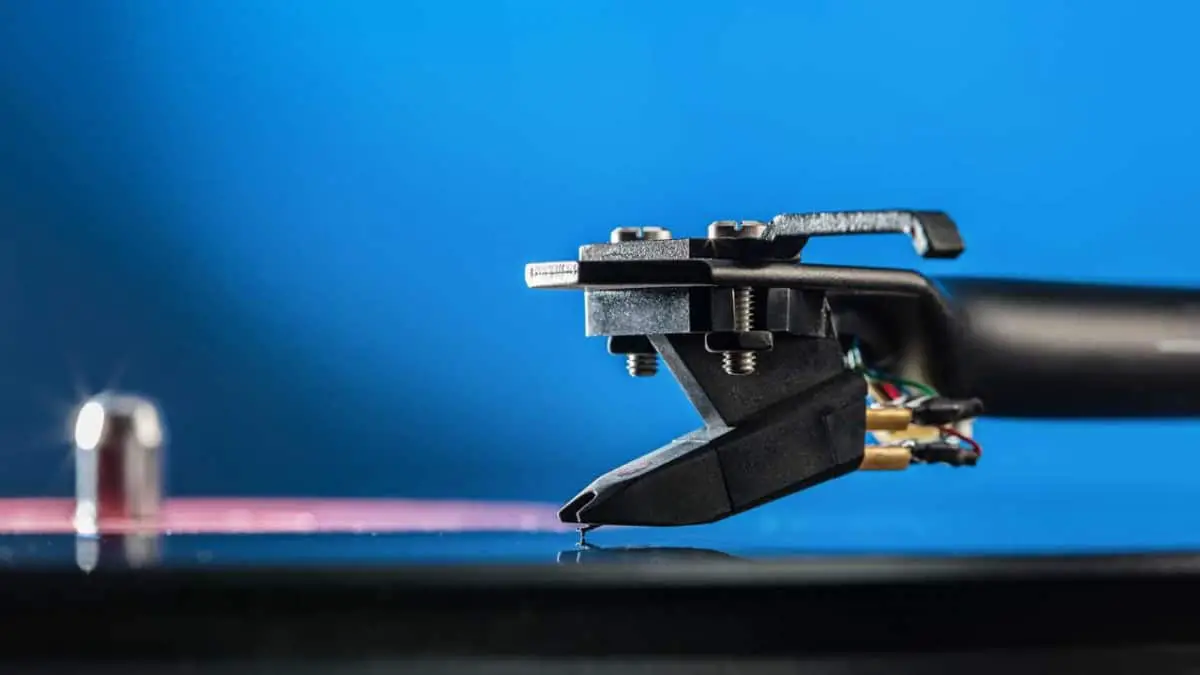
    Start by unplugging the record player from all sources of power and also from your amplifier. Then you’ll proceed with removing the cartridge from the record player.

    Clamp

    For ease of repair, you will want to have a small clamp that can firmly hold the cartridge with the needle facing upward. I use a small desk-mounted vice with rubber bumpers that work great at clamping things without damaging them. Of course, you need to ensure you can set the pressure because you don’t want to crush or damage your cartridge.

    Two things that will come in handy here:

    Desk Mounted Vice with Rubber Boots (links to Amazon)

    Magnifying Desk Lamp (links to Amazon)

    Tweezer Nose Pliers (links to Amazon)

    Inspect

    Once you have your cartridge removed and clamped in a secure place, continue to inspect the needle. Look with a magnifying glass to see what the damage is. You need to see if the needle is genuinely bent or if it has dislodged the rubber boot that holds it in place. If you’re lucky, either the boot is just out of place, or the needle got stuck on an angle somehow. 

    Align

    Try to gently align it with your fingers or a tip of a toothpick if you can’t see any noticeable bend. If there is a bend, you will need to clamp the needle, without touching the tip, in a way that straightens the bend, or you will need to grasp the needle on either side of the bend.

    Given the size of the needle, you can understand how you require a surgeon’s hands to achieve grabbing the needle on either side of the bend and straightening it. It is a challenging process.

    When I attempted to straighten a bent needle on a cartridge on my turntable, I wound up snapping one by using too much force to bend it straight. Again I tried on a spare that had a bend. I could bend it straight using two micro needle-nose pliers I used to build electronic circuit boards.

    There is nothing I can tell you to help other than I hope you have steady hands, a tremendous hands-free clamp, a light and magnifying glass and a lot of patience.

    You need specialized fine tools to be successful with straightening a needle, and often it doesn’t matter, and you wind up replacing the cartridge anyway. But let me tell you more of the needle I didn’t break when I tried to fix a bent record player needle.

    Reinstall

    After straightening the needle as best, I could (by the naked eye, I saw no bend, but it was still slightly bent when viewed under magnification), I reinstalled it and tested it. 

    Test

    Although it played music, there was a weird high treble to the sound. It was difficult to explain but unbearable after only a few moments. The sound was just not traveling along the needle the same as it once did. I wound up replacing the cartridge.

    Some Cartridges Have Replaceable Needles

    Depending on the manufacturer, popularity, cost, and some other variables, you might be in luck to find a replacement needle for your cartridge. Most big box brands will not offer such replacement parts as it is in their higher profit interest to sell you a whole new cartridge. However, many specialty brands or serious audiophile brands may offer replacement components. 

    If you happen to have a brand like Audio Technica, you can likely get a replacement needle for your cartridge. The replacements range from about $30 to over $100, depending on the model.

    Not all brands offer replacement needles, and many only offer replacement cartridges, needle included.

    Or, you may find an aftermarket component if you’re lucky. And again, it is a highly delicate procedure and requires special tools and skills. Your best bet is still to replace the cartridge and maybe keep a spare around if this happens again.

  • Where Does The Needle Go On A Record? (We’ve Got The Answer)

    Where Does The Needle Go On A Record? (We’ve Got The Answer)

    Understanding how records work is vital to placing the needle on the record in the correct place. So, how do you know where the correct place on the record is? Well, don’t worry, I won’t let you scratch up your records by dropping the needle in the wrong spot.

    If you are playing a record from the beginning, there is a narrow band around the outside edge of the vinyl record called the lead-in; place the needle here to begin playback. If you look at the record from an angle, you’ll see a slightly darker band.

    If you are playing the record from a particular track, you’ll need to use a different method of finding the location, which I’ll detail below. I’ll also explain why the lead-in is essential to use, rather than just dropping the needle into a groove, so stick with me to the end. Let’s get this spinning, shall we?

    Where Does The Needle Go On A Record? It Depends Where You Want To Play.

    The longest vinyl record in standard production is the twelve-inch 33 ⅓ rpm recording. This size of the record can store about 22 minutes of music per side for a total of about 44 minutes. These records are used for albums and LPs.(source)

    The record is divided up by the music recorded on it. Regardless of the music, whether it’s an album of songs or a symphony, there will be a lead-in and lead-out on either end of the recording, on both sides of the record.

    Placing the needle in the lead-in zone of the record is ideal when starting from the beginning.

    Placing the needle on the lead-in ring segment separating tracks on a vinyl record is possible but not advised for the new turntable apprentice. I’ll get into why in a moment.

    Needle Safe Zones

    There are three ‘needle safe zones on a vinyl record:

    1. Lead-In Zone
    2. Mid Lead-In/Out Zones
    3. Lead-Out Zone

    A quick explanation of each, and we’ll get to why these are fundamentally essential areas to release the needle onto the vinyl.

    Following, you will find the explanations of each of the needle dropping-safe zones. The image below the three-zone descriptions shows each area on the record for easy reference.

    A – Lead-In Zone

    The intended area where the needle should meet the vinyl record. Audiophiles will tell you that you should play a record from beginning to end without disturbance. It means starting in the lead-in zone and nowhere else.

    The lead-in zone is the wider of the dark circles around the record. The lead-in zone is on the outermost edge of the record. The position of the lead-in zone is dependent upon the fact that the record is designed for play, starting at the outer edge and working inward.

    B – Mid-Lead-In/Out Zones

    The mid-lead-out or mid-lead-in zones are the darker rings that appear on a record. These zones are in between tracks on the record.

    The number of mid-lead-in/out zones depends on the number of tracks on the record. You can count these rings to find the place to drop the needle to start at a particular track on the album rather than the beginning.

    How To Find A Track On A Record By Counting Lead-In/Out Zones

    1. Start at the outer edge of the record. Often the sleeve or label will state a side A or side B and which tracks are on each side. The outer edge of the record has the main lead-in area. This area is off-color compared to the bulk of the record, making it fairly easy to discern. Count this area as one because it leads into track 1 of the record.
    2. The next small ‘line’ that shows on the record, closer to the center label, is the lead-out zone for track 1 and also the lead-in zone for track 2. Therefore, we can call this area the track 2 lead-in zone.
    3. Count subsequent ‘lines’ on the record, counting up from the first (1) on the outer edge of the record until you find the ‘line’ or lead-in zone for the appropriate track you are looking for.
    4. That’s it! Now use extreme caution to set the needle in place. Caution aids in preventing damage to your record, or the needle for that matter.

    C – Lead-Out Zone

    Although the lead-out zone and final locking grooves are acceptable to drop the needle, I can’t imagine why anyone would bother. There are no tracks after the final lead-out zone near the center of the record. This zone leads to a locking groove that is designed to skip to hold the needle from meandering into the record label section.

    Why Not Drop The Needle Anywhere On The Record?

    Take a good, long look at your record. The tiny lines are grooves that are cut, near microscopically, into the vinyl record. Can you see the tiny nuances within a cut groove that show the sounds of a track? Not likely!

    The grooves on a vinyl record are only about 0.0015 to 0.00314 inches wide; that’s 0.04 to 0.08 mm wide for those of you using metric. The last time I checked, that was very small and near impossible for normal humans to see the detail. (source)

    Now, consider the enormous clumsy hands of a human compared to that microscopic-like world where one could see the nuances of the cut groove.

    With that in mind, drop the needle on this fine-cut groove, and you’re likely to cause permanent damage. Likewise, if you drop the needle regularly on a place on the record, you will invariably cause damage.

    How Tracking Force Is Involved

    The downward pressure applied to the stylus, and thus the needle, will invariably play a role in how your needle interacts with your records. And it doesn’t just affect regular play; it affects dropping the needle as well. (source)

    The tracking force pushes down on the needle to hold it in place in the record groove. However, some novice DJs tend to set their tracking force high to let them get away with more when it comes to scratching.

    A greater tracking force equates to a heavier needle. When dropped on the lead-in zone, the needle can score the record, causing an annoying and possibly loud blip in the silence before or after a track starts.

    The Best Way To Drop The Needle

    Before playing any records, you should ensure your record player is tuned correctly.

    Proper turntable tuning involves balancing the tonearm with the cartridge in place.

    Balancing the tonearm is essential for the proper tracking force application to the record. However, as mentioned earlier, one can damage a record if the force is too great.

    After balancing the tonearm assembly and placing the record on the platter, start up the spin.

    Gently lift the tonearm out of the holding cradle. Most record needle cartridges have a built-in handle for moving the tonearm assembly. I like to use mine by holding a finger under the lever arm, letting the weight of the tonearm hold it in place on my finger while I maneuver it to the lead-in zone.

    By lowering the needle by holding your finger under the cartridge handle, you ensure you put zero extra pressure on the record via the needle. You simply lower the needle, and that’s it; no downward force applied.

    FAQ

    Do records start in the middle or outside?

    Records start around the outer edge of the record. As the record plays, the needle and tonearm will gradually wander towards the center of the record.

    Does dropping the needle on the record damage it?

    If by ‘it’ we are referring to the needle, the answer is that it will not likely damage the needle. However, if we refer to the record made of PVC plastic compared to the rigid diamond needle, then the answer is yes; dropping the needle can damage it (the record).

    Can you stop a record with the needle down?

    Technically, you can stop a record with the needle down, but it isn’t advised for the sake of the record.

    The best practice is to lift the needle off the record gently, but only when the needle has reached a lead-in or lead-out zone. That way, you don’t risk damaging where the audio is recorded on the vinyl record.