Around 75 thousand turntables are sold in the US each year. One can’t help but wonder whether all those vinyl enthusiasts know how to maintain their gear properly and get the most out of it. Cleaning a turntable needle is one of the essential elements in properly experiencing your music collection.
Here’s how to clean a turntable needle:
- Use a stylus brush for regular maintenance.
- Do light cleaning using a magic eraser.
- Use a stylus cleaning gel for more detailed cleaning.
- Do deep cleaning using a liquid stylus cleaner.
- Use ethanol for extremely grimy turntable needles.
Keep reading to find out all the details on cleaning a turntable needle quickly and effectively.
1. Use a Stylus Brush for Regular Maintenance
Like most things in life, prevention is also the best medicine for turntable needle longevity. Regular stylus cleaning and maintenance is the key to keeping your turntable sounding good and keeping your records scratch-free.
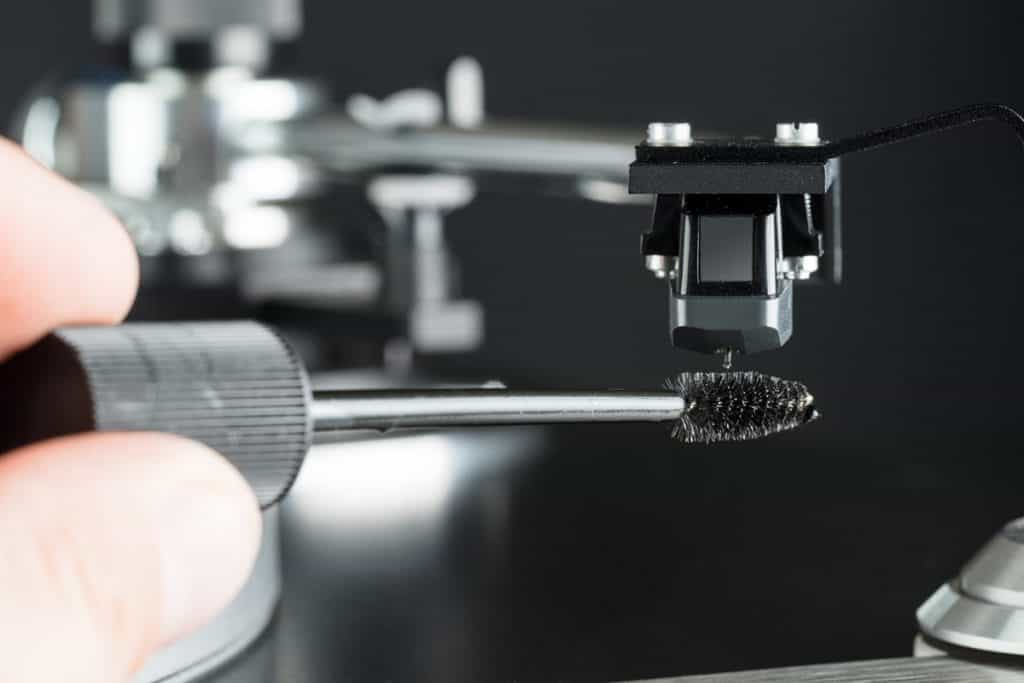
All you need for regular turntable needle maintenance is a soft paintbrush. Vinyl enthusiasts who are willing to spend a few extra bucks can even get a specialty stylus brush for regular needle cleaning.
Whatever of the two items you choose, here’s how the regular turntable needle cleaning process should look:
- Run the stylus brush or a soft paint brush across the tip of the turntable needle two to three times per cleaning.
- Keep each brushstroke light to avoid damage to the turntable needle.
- Repeat the cleaning process at least once per week.
The stylus brush method is considered the most traditional method for cleaning the turntable needle. Such a method isn’t as much of a cleaning method as it aims to prevent dirt from accumulating on the needle.
There’s one important thing to remember with turntable needle cleaning.
All of the dirt that reaches the needle has originated from the records you’re playing. That’s why, in addition to cleaning the needle, you should also look into wiping down your records after a few uses.
All of the dirt that reaches the needle has originated from the records you’re playing. This is why, in addition to cleaning the needle, you should also look into wiping down your records after a few uses.
2. Do Light Cleaning Using a Magic Eraser
Now that you know that regular cleaning and prevention of dirt accumulation is the best method to keep your turntable needle clean. What’s the next best solution if you neglect regular turntable needle maintenance?
Melamine foam pads, more commonly known as magic erasers, are an excellent way to clean your turntable needle. This cleaning method is especially effective on needles that have been slightly neglected and won’t benefit from a light brushing.
Here’s how you can safely apply the magic eraser cleaning method to your turntable needle:
- Cut a piece of the magic eraser (you won’t need more than a sixth of the pad).
- Place the piece of the magic eraser under the needle.
- Lower the turntable needle slowly onto the eraser and lift it.
- Repeat the process until the needle is clean.
Vinyl users who decide to use a magic eraser-type product to clean their turntable needle should keep something in mind: this is an abrasive product that can easily cause more harm than good by damaging the needle. Don’t rub the needle on the piece of foam padding to avoid any potential damage.
Additionally, you shouldn’t use a wet magic eraser for cleaning your turntable stylus. While adding water softens the pad, a dry magic eraser is more abrasive. That’s what makes it capable of cleaning the needle with just a few light touches.
3. Use a Stylus Cleaning Gel for More Detailed Cleaning
Some turntable users might find the previous method too risky or too aggressive. In case the brushing can’t help you, and you’re hesitant to use a magic eraser on your turntable needle, there’s a much safer cleaning solution.
Stylus cleaning gels are purpose-made turntable needle cleaning products. These gels provide the best cleaning performance and micro-dust control, according to experts. Stylus cleaning gels are most commonly urethane-based, meaning you can reuse them as many times as you want.
Follow these steps to effectively utilize any stylus gel product for a detailed turntable needle cleaning:
- Open the packaging that the stylus cleaning gel arrived in.
- Remove any protective covers from the gel.
- Lower the tonearm and the turntable needle into the gel.
- Lift the arm and repeat the last two steps as many times as necessary.
As already mentioned, stylus cleaning gels are products that have a single purpose — cleaning the turntable needle. That means this needle cleaning product has no potential drawbacks, caution alerts, and use warnings.
Stylus cleaning gels are perfectly safe as long as you follow the above instructions. An excellent benefit of this turntable needle cleaner is that you can reuse it.
Once the urethane resin (gel) part gets dirty, you can take it out of the packaging. Rinsing gently with tap water and allowing it around 30 minutes of room temperature drying time should make the gel as good as new.
4. Do Deep Cleaning Using a Liquid Stylus Cleaner
If the gel cleaning method can’t get your turntable needle as clean as new, then you need something that offers a deeper and more powerful cleaning.
Liquid stylus cleaners most commonly come in a bottle that resembles nail polish. While some of the bottles might have an included applicator in the cap, others might require a stylus brush to apply.
Here’s how you use a liquid stylus cleaner the right way:
- Open the bottle and see if there’s an applicator inside.
- Get a stylus brush or a soft paintbrush if there’s no applicator.
- Apply a small amount of the liquid cleaner to the applicator or the brush.
- Remove any excess by tapping the applicator or the brush against the inside of the bottle.
- Run the applicator or the brush across the turntable needle using light pressure.
- Reapply the liquid and repeat the application process until the stylus is clean.
Liquid stylus cleaners are most commonly a mild mixture of rubbing alcohol and water, making them capable of removing dirt from almost any turntable needle. In addition, this alcohol and water mixture also makes liquid stylus cleaners perfectly safe for use and easy to make on your own.
The only thing I’d recommend is to maintain a light touch while applying the product to your turntable needle, just like with any other cleaning method. Suppose you decide to make your own mixture; make sure you use ethanol and distilled water.
5. Use Ethanol for Extremely Grimy Turntable Needles
Suppose none of the methods listed previously can’t clean your turntable needle. That means the turntable needle has been neglected for a while. Don’t worry; there’s always a solution.
Ethanol, or rubbing alcohol, is an excellent way to clean stubborn dirt accumulations from hard surfaces. Using ethanol with no addition of water can be the way to go for those who need to get rid of dirt from their stylus.
You can clean your turntable needle with ethanol by following these steps:
- Apply some rubbing alcohol on a stylus brush or a soft paintbrush.
- Clean the stylus by moving the brush lightly over it.
- Make sure that you use front-to-back and back-to-front motions.
Even though this method is perfectly safe to use on occasion, it shouldn’t be overused. Getting too much liquid onto your turntable needle might increase its degradation.
Final Thoughts
Although there are multiple ways you can clean a turntable needle, all of them share a few common features. Here are just some of the things that every turntable owner should keep in mind if they want to keep their device and records playing for a long time:
- Get a soft stylus brush for regular turntable needle maintenance.
- Use the brush at least once a week.
- Wipe down your records after every use.
- Use other cleaning tips from this article as needed.