Although the Garrard Engineering and Manufacturing Company is barely relevant today, many still aspire to hear and use their turntables due to their vintage quality. However, most Garrard turntables to date are old and are in dire need of repair. To aid you with the very first step of repairing your own Garrard turntable, let us know how to remove a Garrard turntable in three basic steps.
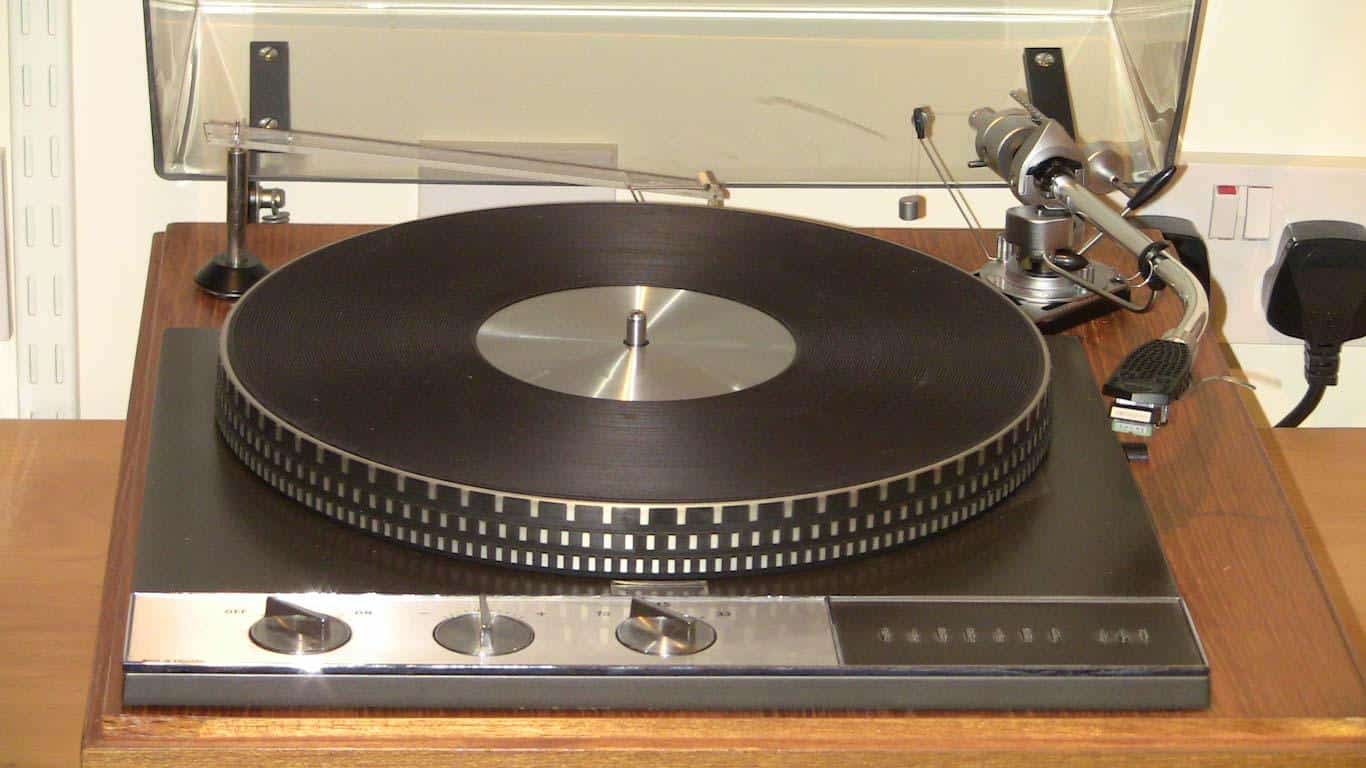
To gain access to your Garrard turntable’s inner workings, you will need to remove the turntable mat. To initiate this, pull from the center first before pulling the sides using either a pen knife or a screwdriver.
Tearing apart your turntable is a very delicate process, and it can seriously get intimidating quickly. However, please do not fret, as we guide you throughout the process step by step, making the whole process a walk in the park.
Taking It Apart: Removing A Garrard Turntable In Three Simple Steps
Most people who own Garrard turntables get them either from a garage sale or through inheritance. Unfortunately, most do not own a manual for it, nor can they bring them to turntable service centers since most do not cater to Garrard turntables. In addition to that, the sheer weight and fragility of Garrard turntables make them extremely difficult to carry around from town to town for repairs. (source)
Although I sincerely discourage repairing them on your own, most people simply do not have the choice, nor do they have the luxury of having a nearby technician. Add to that, and they might just want to do simple maintenance such as oiling or replacing the belt. That is why below, we listed the three easy steps to removing your Garrard turntables.
- Make sure that your Garrard turntable is in an idle state (not playing).
- Unplug the turntable from power sources
- Remove the platter or turntable mat first
Ensure That Everything Is Turned Off
Aside from specific repair requirements, one of the basics of repair and maintenance is to turn off the turntable and unplug it from its power source. Although this may seem as basic as one, two, and three, most people frequently forget to do this step.
Keeping the turntable unplugged keeps you safe from electrocution. But watch out for things like capacitors that can store energy even when electronics are unplugged.
Primarily, electrocution concerns stem from the fact that most turntables, especially Garrard, are powered by the stronger alternating current (AC) instead of, the weaker direct current (DC). In addition to that, we may need to touch the wires for specific repairs, and most repairs involve physical contact with conductive materials, making this process critical for your safety.
In the instance that your turntable was in use before repair, you will need to turn it off. When doing such, make sure that your turntable has cooled off for at least thirty minutes before opening it up. Also, try turning it on and off several times after unplugging. This action will help to dissipate any capacitors that may be present. Moreover, when doing repairs and maintenance regarding the turntable belt, it is critical not to skip this step to prevent any possible injury from a moving part. (source)
Taking It Apart: Removing The Top Layer
Now that you have turned off everything, it should be safe to operate the turntable now. The first thing you will need to remove is the rubber dust cover, as most Garrard turntables require you to remove the dust cover before taking the said turntable apart. This item looks like a caterpillar sliced in half (or like rubber clips, depending on the model) and is used to prevent dust from building up inside the turntable, affecting the sound quality.
The next step is easy to understand but challenging to execute, so read carefully. Newer Garrard turntables tend to remove easily, using a pulling motion on the platter directly from the aligning rod. (source)
However, if you have an older model, we might need a more blunt approach. Gently, using a small hammer and pry edge like a flat screwdriver, gently pry open the Garrard turntable’s platter out of its casing. After doing this, slide the platter off and set it aside in a safe area. (source)
This whole process is beneficial for those who want to remove or replace the belt from their Garrard turntable. However, for those wanting a simple oiling procedure, we might want to refer to Garrard’s user manual (if available).
Diagnosis And Home Repair: Simple Garrard Turntable Maintenance Processes You Can Do At Home
(Image By Porius – Own work, CC BY-SA 3.0, https://commons.wikimedia.org/w/index.php?curid=7743507)
After you have opened up your Garrard turntable, indeed, you are not leaving it at that. That is why, in this section specifically, we will teach you essential maintenance steps to preserve your Garrard turntable. By taking some pages of information directly from the manual, we will discuss these maintenance steps.
Oiling Your Garrand Turntable: It Shouldn’t Be So Hard.
Whether for the motor for the turntable belt or the bearings, your resident Garrard turntable is not the type to require a lot of oiling. However, there are times where oiling becomes less of a luxury and more of a necessity. In those situations, use our short guide on how to oil our Garrard turntable.
The oiling points for your Garrard turntable are accessible by removing the turntable mat. To remove the turntable mat, you will need to lift the turntable from the side after lifting it from the center boss. By following this process, you make sure that the turntable is not damaged nor the insides. (source)
You can access the retaining clip by levering the nameplate with a screwdriver or a penknife in an upward motion. Remove the retaining clip afterward.
You can now remove the turntable. To initiate this, with the foam mat attached, lift the turntable using your fingers on opposing sides while applying the same amount of pressure. This action is done evenly so you don’t create an uneven force that may damage the Garrard turntable.
You can now access the oiling points for the turntable’s motor. To oil effectively, make sure you place the appropriate amount. Any excess oil should be accounted for and removed using cloth. (source)
Replacing The Turntable Belt The Easy Way
After removing the turntable and exposing its internal parts, you can now check the turntable belt. Hold the strap and use your hands to pry the belt away from the belt drive if the turntable belt is still attached to the drive. However, if the belt is broken, throw it away instead. (source)
To make sure that the belt drive is clean, dampen a cheesecloth using isopropyl alcohol. Use the damp cloth to wipe down the belt gently.
When dust and debris build up around the turntable, the sound quality of the Garrard will be affected. Ensure that you wipe the essential parts of the turntable, from the insides to the belt drive, including the new turntable belt and the platter.
Now that everything has been wiped clean, please insert the new turntable belt. Wrap it around the belt drive such that it fits snugly into the drive. (source)
Frequently Asked Questions
- Who Owns The Garrard Engineering and Manufacturing Company?
Since 2018, Garrard Engineering and Manufacturing Company has been owned by Cadence Audio SA. However, the history of Garrard Turntables goes way back to 1915, when it was under Garrard & Co. (source)
- What Are The Record Spindles In My Garrard Turntable For?
Record spindles in Garrard Turntables function for the automatic playing of records. (source)
- How Often Should I Oil My Garrard Record’s Belt?
You can oil it as often as four times a year or once in three months. However, oiling frequency is typically only required about once a year. The frequency will also depend on the condition of the turntable and the frequency with which you use it.
Sources
- ”Garrard in Swindon”, Guide To Swindon, Last Accessed November 2,
- James, “How to Repair a Garrard Turntable”, It Still Works, Last Accessed, November 3, 2021.
- “Garrard Turntable Laboratory Series, Instruction Manual”, Garrard Engineering and Manufacturing Company, Last Accessed November 2, 2021.
- Featured Image By RayL11111111 – Own work, CC BY-SA 3.0, https://commons.wikimedia.org/w/index.php?curid=17656270